The Ultimate Egg Timer & Complete Guide to Perfect Eggs Every Time
Welcome to the only guide you’ll ever need to conquer the humble egg. For years, I’ve pursued the perfect boiled egg — from the jammy, sunset-orange yolk of a six-minute wonder to the firm, creamy center of a flawless hard-boiled egg. It seems simple, but as many of us know, the difference between perfection and a rubbery, green-tinged disappointment is a matter of minutes, or even seconds.
This guide is the culmination of hundreds of tests, countless conversations with professional chefs, and a deep dive into the food science of what makes an egg cook the way it does. We’re not just giving you a timer; we’re giving you the knowledge, the expertise, and the tools to make your perfect egg, every single time — whether you’re boiling, poaching, frying, steaming, or even cooking eggs in an air fryer. Trust us, your avocado toast will thank you.
📋 What’s In This Guide
- Interactive Egg Timer Tool
- The Science of a Perfect Egg
- Types of Eggs: Free-Range, Organic, Pasture-Raised Explained
- How to Boil Eggs Perfectly (5-Step Method)
- Complete Egg Boiling Time Chart
- How to Poach Eggs Perfectly
- How to Make Perfectly Scrambled Eggs
- Fried Eggs: Sunny Side Up, Over Easy, Over Medium, Over Hard
- Steaming Eggs: The Underrated Method
- Sous Vide Eggs for Absolute Precision
- Cooking Eggs in an Air Fryer
- The Perfect Ramen Egg (Ajitsuke Tamago)
- Egg Nutrition: Health Benefits and the Cholesterol Debate
- Egg Size Guide: Medium, Large, XL, Jumbo
- How to Test Egg Freshness
- Egg Storage and Shelf Life
- How to Peel Hard Boiled Eggs Easily
- Recipes: Deviled Eggs, Egg Salad & More
- Expert-Recommended Tools
- Frequently Asked Questions
Interactive Egg Timer for Perfect Results
Your Personal Egg Sous-Chef
Select your preferences below for a perfectly timed egg, based on science!
The Science of a Perfectly Cooked Egg
Why is egg timing so notoriously tricky? It all comes down to protein chemistry. An egg is made of two main parts: the albumen (the white) and the yolk. Each contains different proteins that set, or coagulate, at different temperatures.
- Egg White (Albumen): Starts to set around 144°F (62°C) and becomes firm and opaque at about 149°F (65°C).
- Egg Yolk: Begins to thicken around 149°F (65°C) and becomes fully set and crumbly at 158°F (70°C).
The secret to the perfect “jammy” or “custardy” yolk is holding it in that sweet spot where the whites are fully cooked but the yolk has not yet reached its final firm state. This narrow temperature window is why precision is key. Our timer accounts for egg size (larger eggs take longer for heat to penetrate the center) and starting temperature (a cold egg from the fridge needs more time to reach the target temperature than a room-temperature egg).
The shell itself plays a role too. A chicken eggshell is made of calcium carbonate and is surprisingly porous — it contains up to 17,000 tiny pores through which air and moisture pass. This is why eggs absorb odors in the refrigerator and why older eggs have a larger air sac (gases produced inside as the egg ages escape through the pores, drawing air in). That larger air sac is exactly why a slightly older egg is easier to peel — there is more space for the membrane to separate from the shell during the thermal contraction of the ice bath.
Types of Eggs: Free-Range, Organic, Cage-Free & Pasture-Raised Explained
Standing in the egg aisle can feel overwhelming. The cartons are plastered with labels — “free-range,” “cage-free,” “organic,” “pasture-raised,” “omega-3 enriched,” “vegetarian-fed” — and the prices vary wildly. Here’s a clear, honest breakdown of what each term actually means, and whether it affects the taste and nutrition of your egg.
| Label | What It Means | Outdoor Access | Typical Yolk Color | Worth the Premium? |
|---|---|---|---|---|
| Conventional | Standard battery cages, ~67 sq in per hen | None | Pale yellow | Budget choice |
| Cage-Free | No cages, but usually indoors in barns | Usually none | Light yellow | Marginal upgrade |
| Free-Range | Must have “access” to outdoors — USDA minimum standard is vague | Some | Medium yellow | Moderate step up |
| Organic | Fed certified organic, non-GMO feed; no antibiotics | Required (free-range) | Medium yellow | Yes, for cleaner diet |
| Pasture-Raised | ~108 sq ft per hen outdoors; eats grass & insects naturally | Significant | Deep orange | Yes — best flavor & nutrition |
| Omega-3 Enriched | Hens fed flaxseed; higher ALA/DHA content | Varies | Varies | Yes for omega-3 boost |
The color of the yolk is one of the most reliable visual indicators of egg quality. A deep, vibrant orange yolk signals high beta-carotene content — a direct result of hens consuming grass, insects, and plants rather than grain alone. Pasture-raised eggs consistently produce the most deeply colored yolks. They also tend to have a richer, more complex flavor that is noticeably different from a conventional supermarket egg, particularly when cooked simply — poached, soft-boiled, or fried in butter.
Brown eggs versus white eggs is purely a matter of hen breed — it has no impact whatsoever on nutritional content, flavor, or cooking properties. Brown-feathered hens (like Rhode Island Reds) lay brown-shelled eggs; white-feathered hens (like White Leghorns) lay white ones. The color difference stops entirely at the shell.
Mastering the Basics: How to Boil Eggs Perfectly
Forget everything you thought you knew. This is the foolproof method, backed by our experience and the science we just discussed.
Step 1: Choose Your Weapon (and Your Eggs)
Start with eggs that are not super fresh. We know it sounds counterintuitive, but week-old eggs are actually easier to peel. The air sac at the wide end of the egg expands over time, helping the membrane separate from the shell. As for the pot, choose one large enough so the eggs can sit in a single layer without crowding. Stainless steel or enameled pots with a heavy, even-distributing base are ideal — thin pots develop hot spots that can crack shells and cook unevenly.
Step 2: The Water Entry
For the most consistent results, gently place your eggs in a pot of cold water. Ensure the water covers the eggs by at least an inch. Starting with cold water brings the eggs up to temperature gradually, which is a key factor in preventing cracking and ensuring an evenly cooked result. If you must use eggs straight from the refrigerator and you’re short on time, a compromise is to lower them gently with a slotted spoon into already-boiling water — but add 30 seconds to your timer and expect slightly more cracking risk.
Step 3: The Heat and the Timer
Place the pot on the stove over high heat. The moment the water reaches a full, rolling boil, start your timer. This is where our interactive tool above becomes your best friend. A large egg from the fridge needs about 6 minutes for a soft boil, 8–9 for a medium, and 11–12 for a hard boil. Once the timer starts, reduce the heat to maintain a gentle simmer, not a vigorous boil — vigorous boiling can cause the eggs to knock against each other and crack, and it doesn’t actually cook them faster since water temperature stays at 212°F (100°C) regardless of how vigorously it boils at sea level.
Step 4: The Ice Bath Plunge
This step is non-negotiable for two reasons. First, it immediately stops the cooking process, preventing the dreaded green ring around the yolk from residual heat. Second, it shocks the egg, causing the white to contract and pull away from the shell, making peeling a breeze. As soon as your timer goes off, use a slotted spoon to transfer the eggs directly into a bowl of ice water. Let them chill for at least 5 minutes, or 15 minutes for hard-boiled eggs.
Step 5: Peeling Like a Pro
Gently tap the wide end of the cooled egg on a hard surface, then the narrow end. Roll it on the counter with gentle pressure to create a network of cracks. Start peeling from the wide end, where the air pocket is. If possible, peel it under a thin stream of running water — the water gets under the membrane and helps the shell slide right off.
Complete Egg Boiling Time Chart
The table below covers every common egg size and doneness level, accounting for starting temperature. Use these as your reference alongside our interactive timer above. All times begin when the water reaches a full, rolling boil.
| Egg Size | Starting Temp | Soft Boiled (Runny Yolk) | Medium Boiled (Jammy) | Hard Boiled (Set Yolk) |
|---|---|---|---|---|
| Small (40–49g) | Fridge | 5 min | 7 min | 10 min |
| Small (40–49g) | Room temp | 4 min 30 sec | 6 min 30 sec | 9 min |
| Medium (50–56g) | Fridge | 5 min 30 sec | 7 min 30 sec | 10 min 30 sec |
| Medium (50–56g) | Room temp | 5 min | 7 min | 10 min |
| Large (57–64g) | Fridge | 6 min | 8 min 30 sec | 12 min |
| Large (57–64g) | Room temp | 5 min 30 sec | 8 min | 11 min |
| Extra Large (65–70g) | Fridge | 6 min 30 sec | 9 min | 13 min |
| Extra Large (65–70g) | Room temp | 6 min | 8 min 30 sec | 12 min |
| Jumbo (71g+) | Fridge | 7 min | 9 min 30 sec | 14 min |
| Jumbo (71g+) | Room temp | 6 min 30 sec | 9 min | 13 min |
How to Poach Eggs Perfectly
A perfectly poached egg — with a tender, just-set white that yields gently to reveal a warm, runny yolk — is one of the most satisfying things in all of breakfast cookery. It is also one of the most anxiety-inducing techniques for home cooks. Here’s the truth: poaching eggs is simple once you understand the three rules.
Rule 1: Use the freshest eggs possible. Unlike hard-boiling (where slightly older eggs peel more easily), poaching demands very fresh eggs. The whites of a fresh egg are compact, viscous, and cling tightly to the yolk. The whites of an older egg are thin and watery and will spread into a scraggly, ghostly mess the moment they hit the water. If your eggs are more than 10 days old, save them for scrambled eggs or hard-boiling.
Rule 2: Barely simmering water, not boiling. Boiling water is too aggressive — the turbulence tears the delicate white apart before it has time to set around the yolk. Fill a wide, shallow saucepan or sauté pan with about 3 inches of water. Bring it to a very gentle simmer — small bubbles occasionally rising from the bottom, no rolling boil. Add 1 tablespoon of white wine vinegar per quart of water. Vinegar lowers the pH of the water and helps the egg white proteins coagulate more quickly, resulting in a neater, more compact poached egg.
Rule 3: The crack-and-swirl method. Crack your egg into a small bowl or ramekin first — never directly into the pan, which is a recipe for off-center yolks and lost shells. Use a spoon to create a gentle whirlpool in the center of the simmering water. Slide the egg from the ramekin into the center of the swirl. The spinning motion wraps the white around the yolk, producing that beautifully tidy oval shape you see in restaurants. Cook for exactly 3 minutes for a runny yolk, or 3 minutes 30 seconds for a slightly firmer set. Remove with a slotted spoon and drain briefly on a paper towel before serving.
How to Make Perfectly Scrambled Eggs
Scrambled eggs might be the most deceptively simple dish in the entire culinary canon. Two or three ingredients, five minutes — and yet the range of quality between a bad scramble and a sublime one is enormous. The difference comes down almost entirely to technique: how you mix the eggs, how hot your pan is, and when you stop cooking.
The American Style: Fluffy & Light
The classic American-style scrambled egg is light, fluffy, and slightly curdy. Whisk eggs vigorously with a splash of cold water or milk (about 1 tablespoon per 2 eggs), a pinch of salt, and a grind of pepper. Heat a non-stick pan over medium-high heat, add butter, and when it foams, pour in the eggs. Let them sit undisturbed for 15–20 seconds until they begin to set at the edges, then fold gently with a spatula, creating large, soft curds. Remove from heat when the eggs still look slightly underdone — carryover heat finishes them. Season with salt only after cooking, as salting too early can break down the egg proteins and make the result watery.
The French Style: Silky & Creamy (Soft Scrambled)
Soft scrambled eggs in the French style are a revelation if you’ve never made them. They are not fluffy — they are extraordinarily creamy, almost custardy, somewhere between scrambled eggs and a very loose egg sauce. Gordon Ramsay popularized the technique internationally. Crack eggs directly into a cold non-stick pan with cold butter (no pre-heating). Place over medium-low heat and stir continuously with a rubber spatula, moving the eggs constantly across the entire base of the pan. Take the pan off the heat every 30 seconds to control the temperature. After 4–6 minutes of patient stirring, you’ll have small, glossy, custard-like curds. Remove from heat while still appearing very slightly underdone. A teaspoon of crème fraîche or sour cream stirred in at the very end adds a silky tang that takes them to another level entirely.
Fried Eggs: A Complete Guide to Every Style
A fried egg seems like the simplest preparation of all, but there are actually four distinct styles, each with a specific technique, and each appealing to different preferences and dishes. Understanding the difference between them — and mastering each one — is a foundational kitchen skill.
🍳 Sunny Side Up
Cooked only on one side, never flipped. The white is fully set; the yolk is completely raw and runny, with a golden, almost liquid appearance. Cook in butter over medium-low heat with a lid placed on the pan to gently steam and set the top of the white without flipping. Takes 3–4 minutes.
🔄 Over Easy
Fried on both sides, with the yolk still fully runny. Cook sunny side up until the white is about 90% set, then flip carefully with a thin spatula and cook for just 15–20 seconds on the second side. The yolk should be warm but completely liquid when pierced.
🥚 Over Medium
Flipped like over easy, but cooked for 30–45 seconds on the second side. The yolk is partially set — still somewhat soft and jammy in the center but no longer fully liquid. This is many people’s favorite style for sandwiches and burgers.
⬛ Over Hard
Flipped and cooked until the yolk is completely firm throughout, with no runniness whatsoever. Cook 60–90 seconds on the second side, or briefly break the yolk before flipping to ensure it sets fully. The standard for an egg on a burger when you don’t want mess.
🧈 Basted
A restaurant technique where the egg is cooked sunny side up in generous butter, and then hot butter is continuously spooned over the yolk while cooking. This sets the surface of the yolk with a thin, opaque white layer while keeping it warm and runny inside — the best of both worlds.
🫒 Spanish / Crispy
Cook in generous olive oil over high heat. The white immediately puffs and crisps around the edges while developing lacy, golden-brown frills. The yolk remains runny. Constantly spoon the hot oil over the yolk while cooking. Finished in under 90 seconds. Essential for huevos rotos.
Steaming Eggs: The Underrated Method for Perfect Results
Steaming is one of the most underrated methods for cooking eggs in the shell, and it consistently outperforms boiling in one critical area: it makes eggs dramatically easier to peel, even when using very fresh eggs. The reason is simple — steam transfers heat more efficiently than boiling water and penetrates the shell more evenly, which means the egg cooks from the outside in at a more controlled rate, causing less adhesion between the membrane and the shell.
To steam eggs, fill a saucepan with about 1 inch of water and bring it to a full boil. Place a steamer basket or colander above the water — the eggs should not touch the water. Add your eggs, cover tightly with a lid, and reduce heat to medium. Use the same timing as the boiling chart above, but subtract about 30 seconds from each time since steam cooking is slightly more efficient. Transfer to an ice bath immediately when done.
Many chefs and food scientists, including J. Kenji López-Alt of Serious Eats, have tested steaming extensively and concluded that it not only simplifies peeling but also produces more consistent results than boiling because the temperature inside the steamer remains more stable than a pot of water that may vary between a gentle simmer and a vigorous boil.
Sous Vide Eggs: The Ultimate in Precision Egg Cooking
Sous vide cooking — submerging food in a precisely temperature-controlled water bath — represents the absolute pinnacle of egg cooking precision. Because the water bath is held at an exact, constant temperature, you can achieve textures in a cooked egg that are simply impossible with any other method. The egg cooks slowly to exactly the internal temperature of the bath and no further, producing perfectly repeatable results every single time.
The most famous sous vide egg preparation is the “63-degree egg” (sometimes written as 63°C / 145°F). At this temperature, held for 45–60 minutes, the white is barely set — soft, almost custardy — and the yolk is thick, creamy, and flowing, like a very rich, warm pudding. It is a completely different sensory experience from any boiled or poached egg and is used extensively in fine dining as a garnish for risottos, pastas, salads, and soups.
| Temperature | Time | Result | Best Used For |
|---|---|---|---|
| 140°F (60°C) | 60 min | Very soft, translucent white; yolk barely thickened | Adventurous presentations |
| 145°F (63°C) | 45–60 min | Soft white; thick, flowing yolk (the classic “63° egg”) | Risotto, pasta, salads, ramen |
| 149°F (65°C) | 45 min | Fully set white; jammy, custardy yolk | Avocado toast, grain bowls |
| 158°F (70°C) | 30–40 min | Firm white; soft, velvety hard-set yolk — no green ring possible | Egg salad, deviled eggs |
| 167°F (75°C) | 20 min | Firm white; fully set, crumbly yolk | Meal prep hard boiled eggs |
You do not need an expensive immersion circulator to get started with sous vide eggs. A large pot, a cooking thermometer, and a gas burner you can modulate carefully can approximate the technique. However, a dedicated immersion circulator maintains the precise temperature automatically and takes all the guesswork out of the equation, making it a worthwhile investment for anyone who is serious about egg cookery.
The Modern Twist: “Boiling” Eggs in an Air Fryer
Did you know your air fryer, the king of crispy fries and quick weeknight meals, can also produce perfectly “boiled” eggs? It’s true! The circulating hot air cooks the eggs right inside their shells, with no water required. This method is incredibly convenient and yields surprisingly consistent results.
The process is simple: preheat your air fryer, place the eggs in the basket, and cook. But just like with boiling, timing and temperature are crucial. This is where understanding your appliance comes in. A key debate among enthusiasts is the digital vs. manual air fryer; digital models often offer more precise control, which is a huge advantage here.
To achieve the perfect air-fried boiled egg, you’ll need to master your air fryer’s temperature control. A common starting point is 250°F (120°C). Cook for about 13 minutes for soft-boiled, 15 for medium, and 17 for hard-boiled. Remember to transfer them to an ice bath immediately after, just as you would with traditionally boiled eggs. The benefits of using an air fryer for this task include water conservation and a wonderfully simple cleanup. If you’re just getting started, there are many fantastic air fryer recipes for beginners that can help you get comfortable with your machine.
The Perfect Ramen Egg (Ajitsuke Tamago): A Complete Guide
The ramen egg — known in Japanese as ajitsuke tamago (味付け玉子), meaning “seasoned egg” — is one of the most iconic and beloved egg preparations in all of Asian cuisine. A perfectly made ramen egg has a specific, deliberate set of characteristics that distinguish it from an ordinary soft-boiled egg: the white should be firm but not rubbery, with a deep brown, glossy, marinated surface; the yolk should be a vivid, almost neon orange-gold, perfectly jammy at the center; and the flavor should be deeply savory, subtly sweet, and permeated by the umami richness of soy and mirin throughout the entire egg white.
The Marinade
The classic marinade is simple but requires good-quality ingredients. Combine 3 tablespoons of soy sauce (tamari for a gluten-free version), 3 tablespoons of mirin, and ¼ cup of cold water. Some recipes add a teaspoon of rice vinegar for brightness, a dash of sake, or a tablespoon of honey for a slightly sweeter profile. Heat gently just until the mirin is warmed and everything is combined. Do not boil. Let the marinade cool completely before using it.
The Cook
For the ideal ramen egg texture, cook a large egg at a rolling boil for exactly 6 minutes 30 seconds if coming from the refrigerator, or 6 minutes if at room temperature. The yolk should still be soft and slightly translucent at its very center — this is the target. Transfer immediately to an ice bath and cool for a minimum of 10 minutes before peeling very carefully. The white is delicate at this stage.
The Marinade Period
Place the peeled eggs in a zip-lock bag or a snug container and pour the cooled marinade over them. The eggs should be as fully submerged as possible — you can place a folded piece of parchment paper or a small zip-lock bag filled with water on top to keep them below the surface. Refrigerate for a minimum of 4 hours, though 12–24 hours produces a more deeply colored, more thoroughly flavored egg. At 48 hours, the marinade flavor is at its peak intensity. Beyond 48 hours, the outer white can become too salty and slightly rubbery — don’t over-marinate.
Egg Nutrition: Health Benefits, Calories & the Cholesterol Debate
Eggs are one of the most nutritionally dense foods on earth, yet they spent decades under a cloud of nutritional suspicion due to concerns about cholesterol. The scientific consensus has shifted dramatically since the 1970s cholesterol panic, and eggs are now widely recognized by nutritionists and physicians as an exceptionally healthy food for the vast majority of people.
Nutritional Profile of One Large Egg (50g)
That single large egg contains all nine essential amino acids, making it a “complete protein.” The biological value of egg protein — a measure of how efficiently the body uses the protein consumed — is higher than nearly any other whole food source, including meat, fish, and dairy. Athletes and fitness-focused individuals have long recognized eggs as one of the most efficient and affordable high-quality protein sources available.
Choline deserves particular attention. Many people have never heard of it, yet it is classified as an essential nutrient — the body cannot produce sufficient quantities on its own. Choline is critical for liver function, metabolism, brain development (especially in fetuses and infants), and the synthesis of acetylcholine, a key neurotransmitter. A single large egg provides about 27% of the daily adequate intake for adults, making eggs one of the single best dietary sources of choline available.
The cholesterol debate, clarified: For most healthy people, dietary cholesterol (like that in egg yolks) has a smaller effect on blood cholesterol than was historically believed. Saturated and trans fats have a greater impact on LDL (“bad”) cholesterol levels. Major health organizations including the American Heart Association and the 2020–2025 Dietary Guidelines for Americans no longer specify a daily upper limit for dietary cholesterol and generally consider one egg per day safe for healthy individuals. People with diabetes or pre-existing heart disease may want to consult their physician about egg consumption frequency.
How to Test Egg Freshness: The Float Test & Other Methods
Knowing how to test whether an egg is still safe and good to eat is an essential kitchen skill. Eggs don’t come with a reliable expiration date — the “sell by” or “best by” date on a carton is a retailer date, not a hard safety cutoff. With proper refrigeration, eggs commonly remain safe and high quality for 3–5 weeks beyond the pack date.
The Float Test (Most Reliable)
Fill a bowl or glass with cold water and gently lower the egg in. Interpret the results as follows:
- Sinks and lies flat on its side: Very fresh egg (1–7 days old). Small air sac. Best for poaching and frying.
- Sinks but stands on one end, tilted: About 2–3 weeks old. Air sac has grown but egg is still perfectly safe and good to eat. Ideal for boiling.
- Floats to the surface: The air sac is very large, indicating the egg is old. It may still be safe, but smell it after cracking — if it smells sulphurous or “off,” discard it. When in doubt, throw it out.
The Crack and Sniff Test
Crack the egg into a bowl and observe. A fresh egg will have a firm, compact white that stays close together and a round, upstanding yolk. An older egg’s white will spread thinly across the bowl, and the yolk will be flat. Give it a sniff — a good egg smells neutral. Any sulphurous, sour, or “off” odor means the egg is bad and should be discarded immediately, regardless of the float test result.
The Candle Test (Candling)
Professional egg graders use a process called “candling” — shining a bright light through the shell in a darkened room to assess the size of the air sac, the position and stability of the yolk, and the presence of any cracks, blood spots, or abnormalities. You can approximate this at home by holding a bright flashlight or phone torch tightly against the wide end of the egg in a dark room. A fresh egg will show a small air sac and a barely visible yolk.
Egg Storage & Shelf Life: Everything You Need to Know
How you store your eggs dramatically affects both their safety and their culinary performance. There are notable differences between how eggs are stored in the United States versus Europe and most of the rest of the world — a difference that stems from how eggs are processed after they leave the hen.
In the US: Eggs are commercially washed and sanitized before sale, which removes the natural “bloom” (cuticle) that coats the shell and acts as a natural microbial barrier. Once this bloom is removed, the egg becomes more porous and vulnerable to bacterial contamination, which is why USDA regulations require refrigeration. American eggs must be refrigerated and are typically good for 4–5 weeks from the packing date.
In Europe and most other countries: Eggs are not commercially washed, so the natural bloom remains intact. This allows them to be safely stored at room temperature for up to 2–3 weeks. However, once an unwashed egg is refrigerated, the rules change — it must continue to be refrigerated because condensation from temperature fluctuation can introduce bacteria through the pores.
| Egg Type / State | Refrigerator (35–40°F) | Room Temperature | Freezer |
|---|---|---|---|
| Raw, in shell (US/washed) | 4–5 weeks from pack date | Not recommended | Do not freeze in shell |
| Raw, in shell (EU/unwashed) | 5–6 weeks | 2–3 weeks | Do not freeze in shell |
| Raw whites only | 2–4 days (airtight container) | Not recommended | Up to 12 months |
| Raw yolks only | 2 days (cover with water) | Not recommended | Up to 12 months (add ⅛ tsp salt or sugar per yolk) |
| Hard-boiled, in shell | 1 week | 2 hours max | Not recommended (whites become rubbery) |
| Hard-boiled, peeled | 5 days (damp paper towel) | 2 hours max | Not recommended |
| Deviled eggs / egg salad | 3–4 days | 2 hours max | Not recommended |
| Ramen eggs (marinated) | 3–4 days after peeling | Not recommended | Not recommended |
How to Peel Hard Boiled Eggs Easily: Every Technique Tested
The frustration of a hard-boiled egg that refuses to peel cleanly — tearing chunks of white away with every fragment of shell — is one of the most common and irritating kitchen experiences. The good news is that this problem is almost entirely preventable, and once you understand why it happens, you can reliably produce eggs that peel in seconds with the shell coming off in two or three clean pieces.
The root cause of difficult peeling is the degree of adhesion between the inner membrane and the egg white. In a very fresh egg, the white has a lower pH (more acidic) and adheres tightly to the inner membrane. As the egg ages, carbon dioxide escapes through the pores, the pH rises, and the bond between membrane and white weakens. This is why 7–14-day-old eggs are ideal for hard-boiling and peeling.
Proven Peeling Techniques
- The ice bath (most important): The thermal contraction from hot to ice-cold causes the white to pull away from the membrane, creating a gap that makes peeling dramatically easier. Never skip this step.
- The rolling method: On a hard surface, gently roll the cooled egg with the palm of your hand using moderate pressure, creating a network of fine cracks all over the shell. Start peeling from the wide end where the air sac is — the shell and membrane lift away most easily there.
- Peel under running water: Cool water running over the egg lubricates the membrane and helps the shell slide free. This is particularly effective for stubborn eggs.
- The shake method: Place the cooled egg in a lidded jar or container with a small amount of water. Shake vigorously for 10–15 seconds. The water and the forceful contact with the sides of the container crack the shell uniformly and loosen the membrane, making peeling very fast.
- Add baking soda to the water: Adding ½ teaspoon of baking soda per quart of water raises the pH of the cooking water, which can help lower the adhesion of the membrane. Results are inconsistent but worth trying with very fresh eggs.
- Steam instead of boil: As noted in the steaming section above, steaming produces eggs that peel more easily than boiling, even with fresh eggs — a useful trick if you keep backyard chickens or buy eggs directly from a farm.
Recipes: Deviled Eggs, Egg Salad, Eggs Benedict & More
Classic Deviled Eggs
Deviled eggs are the perfect party appetizer: impressive to look at, easy to eat, infinitely customizable, and beloved by almost everyone. The key to great deviled eggs is the filling texture — it should be silky-smooth, not lumpy, with a balance of richness (from the yolk and mayo), tang (from mustard and vinegar), and enough salt to make every flavor pop.
Hard boil 6 large eggs using the method above. Peel them, halve lengthwise, and gently pop the yolks into a bowl. Mash the yolks thoroughly with a fork. Add 3 tablespoons of good-quality mayonnaise, 1 teaspoon of Dijon mustard, 1 teaspoon of white wine vinegar or pickle brine, a large pinch of salt, and a grind of white pepper. Mix until completely smooth — a hand mixer or small food processor produces the silkiest result. Taste and adjust seasoning. Transfer to a piping bag (or a zip-lock bag with one corner snipped) and pipe into the egg white halves. Garnish with a light dusting of smoked paprika and a small piece of chive or cornichon. For variations, add a teaspoon of sriracha for heat, fold in crispy crumbled bacon, or top with smoked salmon and a tiny dollop of crème fraîche.
Perfect Egg Salad
Egg salad has a reputation problem — it can be gluey, bland, and texturally monotonous. A well-made egg salad is none of those things. The secret is in the technique: do not over-mash the eggs. You want distinct pieces of white and yolk providing contrasting textures, not a uniform paste. Hard-boil 4 large eggs, peel, and chop them roughly with a knife rather than mashing with a fork. Combine with 2 tablespoons of mayonnaise, 1 teaspoon of Dijon, a tablespoon of finely chopped celery, a tablespoon of finely chopped red onion (soaked in cold water for 10 minutes to tame the sharpness), a teaspoon of fresh dill or tarragon, salt, pepper, and a squeeze of fresh lemon juice. Stir gently to preserve the texture. Serve on toasted sourdough with crisp lettuce and extra dill. Egg salad keeps for 3 days refrigerated in an airtight container.
Eggs Benedict: The Fundamentals
Eggs Benedict — a split and toasted English muffin, a slice of Canadian bacon or ham, a poached egg, and a generous spoonful of hollandaise sauce — is considered the crown jewel of brunch cookery. The hollandaise is the element that intimidates most home cooks, but it can absolutely be made at home. A basic blender hollandaise is nearly foolproof: blend 3 egg yolks, 1 tablespoon of lemon juice, and a pinch of salt in a blender for 30 seconds, then with the motor running, slowly drizzle in ½ cup of very hot (not boiling) clarified butter. The sauce will emulsify and thicken before your eyes. Season with salt, white pepper, and a tiny pinch of cayenne. Use immediately or keep warm by placing the blender jar in a bowl of warm water. Pair with a perfectly poached egg using the technique described in our poaching section above, and you have a brunch dish worthy of any restaurant.
Expert-Recommended Tools for Egg Perfection
While you can achieve greatness with just a pot and a timer, certain tools can make the process absolutely foolproof. As a kitchen gear enthusiast, I’ve tested dozens of products. These are my top picks available on Amazon that deliver on their promise of quality and consistency.
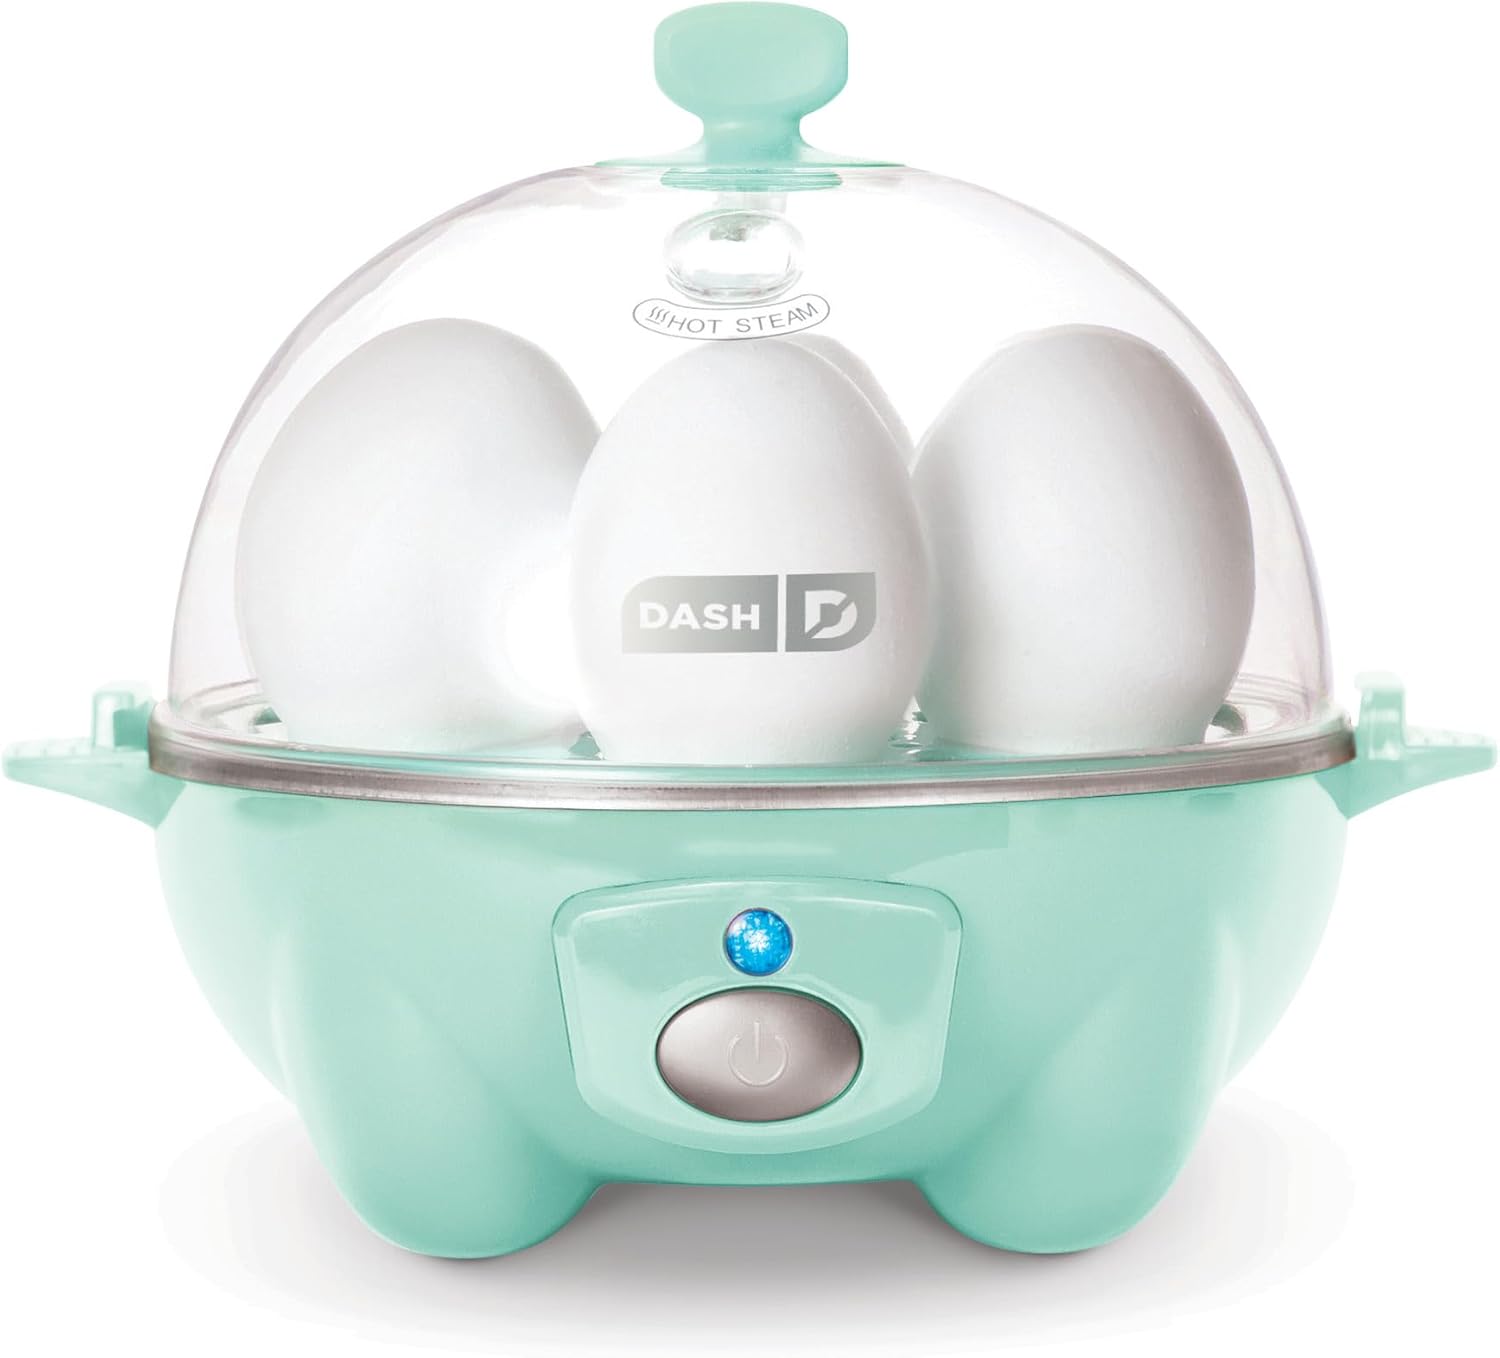
1. Dash Rapid Egg Cooker
This is the #1 bestselling egg cooker for a reason. It’s my go-to recommendation for anyone who eats eggs regularly. It uses steam to cook up to 6 eggs to soft, medium, or hard-boiled perfection. Just measure the water with the included cup, push a button, and wait for the buzzer. It’s virtually impossible to mess up, and it’s a game-changer for busy mornings.
Check Price on Amazon
2. OXO Good Grips Punctual Egg Timer
If you prefer the traditional stovetop method but want more than your phone’s timer, this is the one. The OXO timer is simple, loud, and incredibly durable. The large, easy-to-read numbers and comfortable grip make it a joy to use. It’s a classic, reliable tool that belongs in every kitchen. No frills, just pure, dependable performance.
Check Price on Amazon
3. All-Clad D3 Stainless Steel Saucepan (3-Quart)
The quality of your pot matters. A heavy-bottomed saucepan like this one from All-Clad provides excellent heat distribution, which is vital for even cooking. Thin, cheap pots can have hot spots, leading to inconsistent results. This is an investment piece, but it will last a lifetime and improve all of your cooking, not just eggs. It’s the kind of trusted equipment found in professional kitchens.
Check Price on Amazon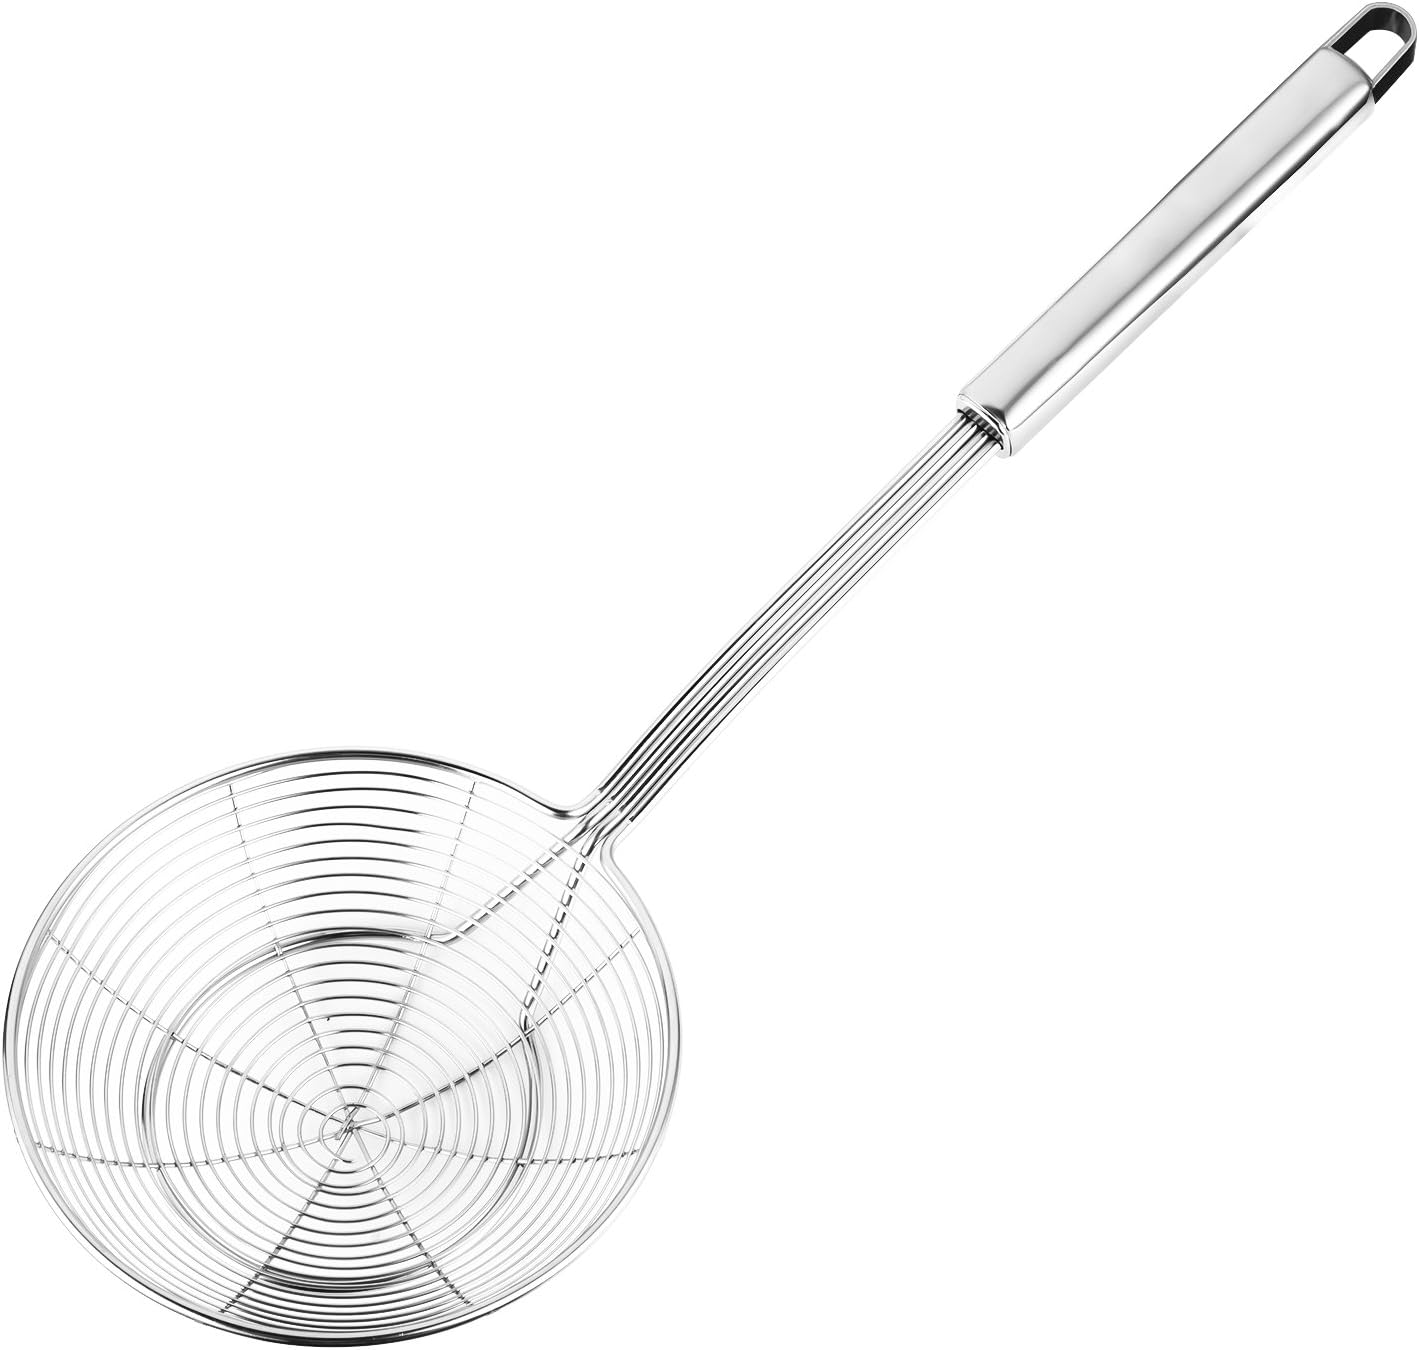
4. Stainless Steel Spider Strainer
Ever chased eggs around a pot of boiling water with a small spoon? A spider strainer makes transferring eggs from boiling water to an ice bath safe and effortless. You can move all the eggs at once, ensuring they all stop cooking at the exact same moment for maximum consistency. It’s also fantastic for pasta, blanching vegetables, and deep frying. A true multi-tasker.
Check Price on AmazonAs an Amazon Associate, I earn from qualifying purchases. Your trust is paramount, and I only recommend products I personally use and believe in.
Frequently Asked Questions (Your Egg Queries, Answered)
Why do my eggs crack when I boil them?
Eggs often crack due to “thermal shock” — the rapid temperature change from a cold fridge to boiling water. A gas bubble in the wide end of the egg also expands, creating pressure. To prevent cracking, let eggs come to room temperature first or start them in cold water and bring it to a boil slowly, as our method suggests. Alternatively, use a pin to prick a tiny hole in the wide end of the egg before boiling — this allows the expanding gas to escape without cracking the shell.
What does the green ring around a hard-boiled egg yolk mean?
The greenish-gray ring is a harmless chemical reaction between iron in the yolk and sulfur in the white, forming iron sulfide. It’s caused by overcooking the egg or not cooling it quickly enough in an ice bath. The iron sulfide compound has a slight sulfurous smell and an unappealing appearance, but the egg is still perfectly safe to eat. Following our timer precisely and transferring immediately to an ice bath prevents this completely.
How can I tell if an egg is fresh?
Use the float test: place an egg in a bowl of cold water. If it sinks and lies flat on its side, it’s very fresh (best for poaching and frying). If it sinks but tilts upward at one end, it’s a few weeks old but still perfectly good (ideal for boiling and peeling). If it floats to the surface, the large air sac indicates significant age — crack it open, give it a sniff, and if it smells even slightly off, discard it immediately.
Is it better to peel boiled eggs when they are hot or cold?
Always peel after the ice bath, not while hot. The thermal shock of the ice bath causes the egg white to contract away from the inner membrane, creating a gap that makes the shell separate cleanly. Peeling a hot egg is much more difficult because the white is soft, the membrane is adhered, and you risk tearing the egg apart. Peel the cooled egg under a thin stream of running water for best results.
How long do hard boiled eggs last in the fridge?
Hard-boiled eggs in their shells will keep safely in the refrigerator for up to 1 week. Once peeled, store them in an airtight container with a damp paper towel — this prevents them from drying out and developing a rubbery skin on the surface. Consume peeled hard-boiled eggs within 5 days. Never leave cooked eggs at room temperature for more than 2 hours.
What is the difference between free-range, cage-free, and pasture-raised eggs?
Cage-free hens live indoors without cages but may have very limited space. Free-range hens must have “access” to outdoor space, though USDA regulations leave the definition vague. Pasture-raised hens spend the majority of their time outdoors on grass with access to insects and natural vegetation — typically around 108 square feet per hen. Pasture-raised eggs generally have the deepest-colored yolks, richest flavor, and highest levels of certain nutrients like omega-3 fatty acids and beta-carotene, though they cost significantly more than conventional eggs.
How do I make the perfect soft boiled egg for ramen?
Cook a large egg for exactly 6 minutes 30 seconds in boiling water from the fridge (6 minutes from room temperature). Transfer immediately to an ice bath for 10 minutes, then peel very carefully. Marinate the peeled eggs in a mixture of 3 tablespoons soy sauce, 3 tablespoons mirin, and ¼ cup water for 4–48 hours in the refrigerator. The yolk should be jammy and vibrant orange-gold, and the surface of the white should be a deep mahogany brown with a savory, subtly sweet flavor throughout.
Can I freeze hard boiled eggs?
You should not freeze hard-boiled eggs in the shell or whole peeled hard-boiled eggs — the whites become rubbery, watery, and unpleasant upon thawing. However, hard-boiled yolks freeze reasonably well. If you need to preserve cooked eggs, freeze the cooked yolks separately in an airtight container for up to 3 months. Raw eggs can be frozen successfully — crack them, whisk whites and yolks together (or separately), pour into ice cube trays, freeze solid, then transfer to a zip-lock bag. Frozen raw egg mixture keeps for up to 12 months and thaws overnight in the refrigerator.
Is eating raw eggs safe?
Raw eggs carry a risk of Salmonella contamination, though the overall risk per egg is relatively low — the USDA estimates approximately 1 in 20,000 eggs contains Salmonella. The risk is higher for certain groups: pregnant women, young children, the elderly, and immunocompromised individuals should avoid raw or undercooked eggs. If a recipe calls for raw eggs (Caesar dressing, homemade mayonnaise, tiramisu, some desserts), use pasteurized eggs, which have been heat-treated to kill pathogens while remaining technically raw.
More Expert Tips from a Seasoned Kitchen
- The Vinegar & Salt Myth: Many people add vinegar or salt to the water, believing it helps prevent cracking or makes peeling easier. In my extensive testing, the effect is negligible compared to proper temperature control and using slightly older eggs. Focus on the method, not the myths.
- Altitude Adjustments: Water boils at a lower temperature at high altitudes. If you live above 3,000 feet, you will need to increase your cooking time slightly. Add about 1 minute for every 3,000 feet of elevation above sea level.
- Storing Hard-Boiled Eggs: Store peeled hard-boiled eggs in a sealed container with a damp paper towel to keep them from drying out; they’ll last for up to 5 days. Unpeeled eggs will last for about a week in the fridge.
- The Perfect Ramen Egg (Ajitsuke Tamago): For that iconic, deeply savory ramen egg, marinate peeled soft-boiled eggs for at least 4 hours (and up to 2 days) in a mixture of soy sauce, mirin, and water. It’s a culinary game-changer. See our full guide above for details.
- Season Scrambled Eggs After Cooking: Adding salt to raw beaten eggs before cooking draws out moisture and can result in a watery, weeping scramble. Season your scrambled eggs only after they come off the heat for the silkiest texture.
- The Vinegar in Poaching Water: Unlike for boiling, vinegar genuinely does help when poaching eggs. It lowers the pH of the water, accelerating the coagulation of the egg white proteins and producing a neater, more cohesive poached egg. Use white wine vinegar or distilled white vinegar — avoid balsamic or red wine vinegar, which will color and flavor the egg.
- Room Temperature Eggs for Baking: When a baking recipe calls for eggs, use room-temperature eggs unless stated otherwise. Cold eggs can cause butter in a cake batter to solidify into small lumps and can prevent emulsification from occurring properly, resulting in a dense, uneven texture. Remove eggs from the fridge 30–60 minutes before baking, or place them in warm (not hot) water for 5 minutes for a quick shortcut.
- Identifying Fertilized Eggs: If you keep backyard chickens or purchase from a small farm, you may encounter fertilized eggs. These are safe to eat and are nutritionally identical to unfertilized eggs. You can identify a fertilized egg by a small white bullseye-like spot on the yolk (the blastodisc). In an unfertilized egg, this spot is a simple white dot (the blastoderm). Neither affects flavor or safety.
Conclusion: Your Journey to Egg Mastery
The perfect egg is not a myth. It’s an achievable, repeatable, science-backed reality that is well within reach of any home cook willing to apply a little precision and attention to technique. Whether you are chasing the six-minute jammy yolk for your morning toast, a silky poached egg for Eggs Benedict, a deeply savory ramen egg for weeknight noodles, or a creamy French scramble for a lazy Sunday — the knowledge in this guide gives you the foundation to achieve it with confidence every single time.
The most important takeaways: start eggs from cold water to prevent cracking and ensure even cooking; use our interactive timer adjusted for your specific egg size and starting temperature; always end with an ice bath to stop carryover cooking and simplify peeling; and choose eggs appropriate for the task — slightly older eggs for boiling, the freshest possible for poaching. Beyond technique, remember that the quality of your ingredients matters: a pasture-raised egg from a local farm will reward any cooking method with richer color, deeper flavor, and superior nutrition.
We hope this guide and our interactive egg timer become a trusted, frequently-visited resource in your kitchen. Bookmark it, share it with anyone who has ever suffered through a grey-yolked, difficult-to-peel hard-boiled egg, and come back whenever you need a refresher. Happy cooking — and may all your yolks be exactly as runny (or as set) as you want them to be.


